Getting Started with OvApp
This page explains how to download and install OvApp on an Android device.
OvApp is currently distributed as an APK file, not via the public app store. You might need to allow installation from "Unknown sources" depending on your phone settings.
Download
You can download OvApp using either of the two methods below:
Option A -- Scan the QR Code
Scan the QR code below with your phone's camera to go directly to the download page:

Option B -- Open the Download Link
-
On your Android phone, copy the link below and open it in your browser:
https://apps.omnivoltaic.com/prod/oves.apk -
The APK download should start automatically.
- When the download finishes, you will see a notification or an entry in your browser's download list.
Step 2 -- Locate the APK File
Depending on your phone model and settings, you can find the APK in:
- The Downloads app, or
- The Files / File Manager app under "Downloads".
Look for a file named something like:
oves.apkovapp-prod.apk(exact filename may vary by build)
Installation
Step 3 -- Install OvApp
- Tap the OvApp APK file (
oves.apk). -
If prompted, allow your browser or file manager to install apps from unknown sources:
- You may see a system dialog asking to grant this permission.
- This is required because the app is not installed via the public store.
-
Confirm the installation and wait for it to complete.
-
Once installed successfully:
- The system will show "App installed".
- You will see the OvApp icon in your app drawer or home screen.
First Launch
- Tap the OvApp icon.
-
On first launch, you may be asked to:
- Grant Location permission (for map and routing).
- Grant Bluetooth permission (for BLE device access).
-
After permissions are granted, you will see the login screen.
Login Screen
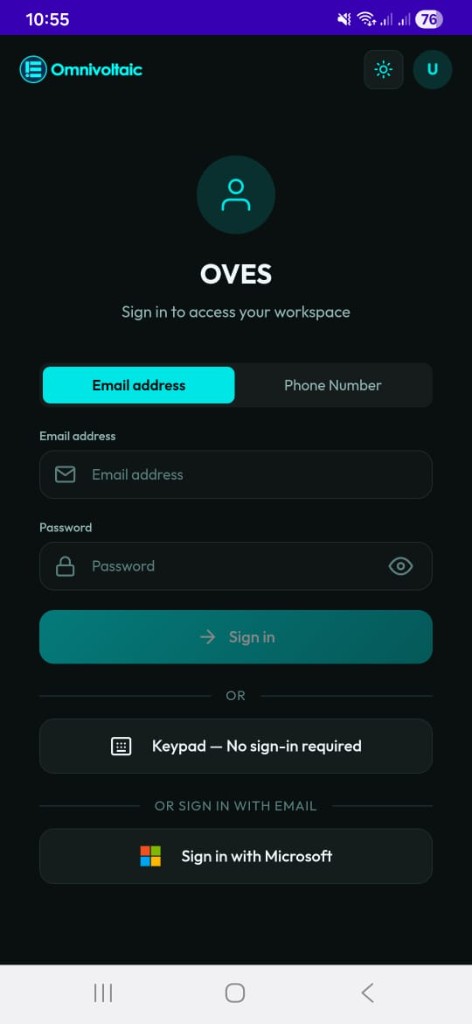
The login screen offers three paths:
Option A — Email & Password (External clients)
Who uses this
This login method is for external clients — distributors, riders, and other partners outside OVES who access OvApp with their own credentials.
Enter your email address (or switch to Phone Number using the tab at the top) and password, then tap Sign In.
Option B — Sign in with Microsoft (Internal OVES staff only)
Internal use only
Sign in with Microsoft is exclusively for internal OVES employees. It authenticates through OVES's Microsoft organisation account and will not work for external clients or distributors.
Tap Sign in with Microsoft to log in with your OVES Microsoft account.
Option C — Keypad (No sign-in required)
Passive Customers who only need to enter activation codes do not need an account.
Tap Keypad — No sign-in required to go directly to the Keypad without logging in.
Service Account (SA) Selection
After a successful login, the next screen depends on how many Service Accounts (SAs) your employee account is linked to:
Multiple SAs — Select Account screen
If your account is linked to more than one SA, you will see the Select Account screen. Each SA card shows the company name, your role tag, and the number of apps assigned.
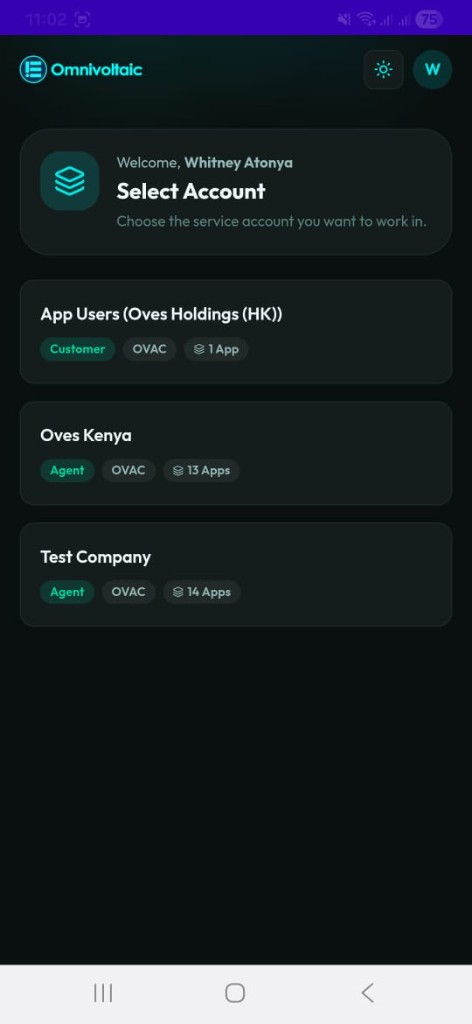
Tap the SA that corresponds to the station or operational context you are working in.
Single SA — automatic navigation
If your account is linked to only one SA, the app skips the Select Account screen entirely and takes you directly to the applet selection grid for that SA.
Applets are assigned per SA, not per user
The applets (workflow tiles) available to you are determined by what has been granted to the selected SA. The same employee may see different applets depending on which SA is active.
Applet Selection
Once an SA is selected, you are taken to the applet selection grid. Tap any tile to launch that workflow.
Note
If the selected SA has only one applet assigned, the app skips the grid and navigates directly into that workflow.
If the SA has no applets assigned, a "No apps available" message is shown. Contact your administrator or switch to a different Service Account.
Logging Out
Tapping the logout or exit icon from within any workflow clears your session tokens and returns you to the login screen. All stored authentication tokens are removed from the device on logout.
You are now ready to start using OvApp. Refer to the role-specific pages for details on what you can do based on your user type.