New Employee Onboarding – Microsoft Teams (Trainee Guide)
Your self-paced reference for getting started on Microsoft Teams as a new OVES employee.
Read This Before Your Training Session
As a new employee, you do not need to wait for a live training session to start familiarising yourself with Microsoft Teams. Go through this guide as soon as you arrive — it will help you get set up, find your way around, and come to the training session already prepared. The live session will then reinforce what you have already explored rather than being your first encounter with the tool.
Before You Begin
What You Need
- Your work email address and password (set up by IT before your first day)
- A device: laptop, desktop, or mobile phone
- 2FA/MFA set up on your account (IT will guide you through this if not yet done)
Can't log in?
Contact IT Support before the session or ask your onboarding facilitator. Do not wait until the session has started.
Translating OVES guides into your preferred language
Training pages on the OVES Documentation Hub (including this guide) are published in English. Use your browser while you read a handbook page:
::: tabs
Whole-page translation uses Google Translate:
- Open the guide or Doc Hub link in Google Chrome.
- Right‑click an empty area of the page (on the article text, not on a photo, button, or link — if nothing happens, try the page background).
- Choose Translate to… (or Translate to [language]).
- Pick your preferred language when asked — the page updates to that translation.
- To change language or show English again: use the control near the right side of the address bar.
If Translate to… does not appear: click Translate in (or beside) the address bar, or ⋮ → Translate…. To be prompted automatically for pages in other languages: ⋮ → Settings → Languages → enable Offer to translate pages that aren’t in a language you read.
Edge uses Microsoft’s translation engine (not Google Translate — same purpose for reading Doc Hub):
- Open the guide or Doc Hub link in Microsoft Edge.
- Right‑click on ordinary text (not a photo or button) → Translate to [language], Translate full page, or Translate — pick an option that translates the whole page, not only a selection.
- If your language is missing, open the Translate panel from the address bar and choose the target language.
- Show original and other options are in the address bar (⋯ next to Translate).
If right‑click shows nothing: use the Translate (globe) control by the address bar. For automatic prompts: ⋯ → Settings → Languages.
Built‑in translation on Apple devices (no Google Translate needed).
Mac
- Open the Doc Hub link in Safari.
- Use Safari → View → Translate webpage (wording varies by version) or the Translate / language control in the address bar when Safari offers it.
- Pick your preferred language; reload or use Show original to revert.
If Translate never appears: Safari → Settings… → check Translation / Languages; some sites cannot be translated.
iPhone and iPad
- Open the Doc Hub link in Safari.
- Tap Aa left of the address bar.
- Tap Translate website (or Translate to [language]) → choose language.
- Tap Aa again for Original or another language.
Firefox varies by version; use whichever applies.
If you see Translate by the address bar
- Open the guide in Firefox.
- Click the translate prompt or icon → choose your preferred language.
Otherwise — translation add‑on (often right‑click or Google Translate‑style workflows)
- Go to addons.mozilla.org → search Firefox Translations, Online Translator, or To Google Translate (review permissions first).
- Install, reload the Doc Hub page, then use the add‑on (right‑click → Translate, toolbar button, or translate this page).
Fallback: Open the same Doc Hub URL in Chrome and use the Chrome tab.
:::
Translations are for guidance
Automated translation helps you follow steps and concepts. For wording that must be exact (contracts, disciplinary text, HR policies), use the original English text or confirm with HR.
What You Will Learn
By the End of This Guide, You Will Be Able To
- Sign in to Microsoft Teams
- Find and navigate teams and channels
- Post messages and reply in threads
- Use @mentions and reactions
- Search for messages, files, and people
- Find your onboarding channels and resources
- Manage your notification settings
- Add a shared mailbox in Outlook on the web (when IT has granted you access)
1. Accessing Teams
Choose the platform that works best for you. All three give you access to the same teams and channels.
::: tabs
- Go to the Microsoft 365 portal or your company app store
- Download and install Microsoft Teams
- Open the app and sign in with your work email and password
- Open your browser and go to teams.microsoft.com
- Sign in with your work email and password
- No installation needed
- Download the Microsoft Teams app from the App Store (iOS) or Google Play (Android)
- Sign in with your work email and password
- Useful for notifications and quick replies on the go
:::
Sign-In
Use your work email and organization password. If prompted for 2FA/MFA, complete the verification step before continuing.
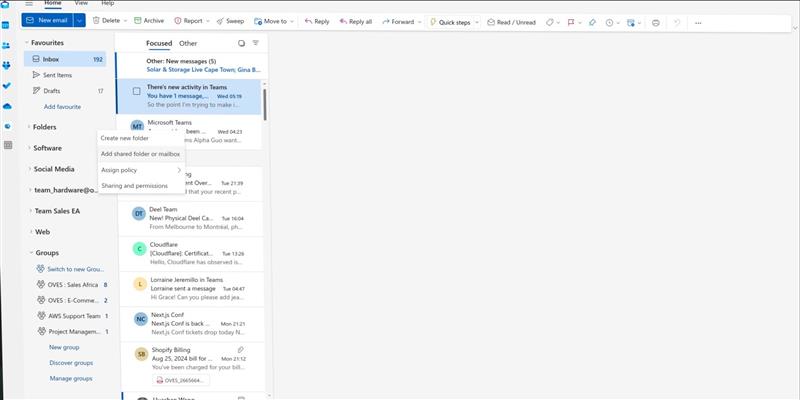
2. Teams & Channels — What They Are
When you first open Teams, you will see a left sidebar. This is where everything lives.
What Is a Team?
A team is a group of people working together. Examples at OVES include Software and Contractors. Each team has its own channels and a shared file library.
What Is a Channel?
A channel is a space inside a team for a specific topic or project — for example, "General", "Onboarding", or "Announcements". Think of a team as a department and channels as its notice boards.
| Channel Type | Who Can See It |
|---|---|
| Standard | All team members |
| Private | Invited members only |
| Shared | Another team or external users (if enabled) |
To find your teams and channels: Look in the left sidebar → click a team → expand its list of channels.
3. Joining and Using Channels
Joining a Channel
- Standard channels are visible to all team members — no action needed to join.
- Private channels require an invite. Ask the channel owner or your manager if you need access.
Posting a Message
| Action | How to Do It |
|---|---|
| Post a new message | Type in the compose box at the bottom of the channel and press Enter |
| Reply to a message | Click Reply underneath the message (keeps the conversation in a thread) |
| @Mention someone | Type @ followed by their name to notify them directly |
| @Mention a channel | Type @channel to notify all members — use this sparingly |
| React to a message | Hover over the message → click the emoji icon that appears |
Attaching Files
Click the paperclip icon in the compose box to attach a file from:
- Your device
- OneDrive
- A shared channel library
4. Your Onboarding Channels
When Will I Be Added?
New employees are added to the OVES onboarding channels after completing onboarding — not before. Once added, you will have access to all training files and resources stored there.
OVES Onboarding Channels
| Channel | What It Contains |
|---|---|
| OVES 全体 | Office 365 Onboarding | Microsoft 365 setup guides and account setup steps |
| OVES 全体 | OVES Training | Training materials and onboarding resources |
Find these in the OVES 全体 team in your left sidebar once you have been added.
5. Searching in Teams
Use search when you need to find a past message, a file, or a colleague.
Open Search
Click the magnifying glass at the top of Teams, or press Ctrl+E on Windows / Cmd+E on Mac.
| You Want to Find | Search For |
|---|---|
| A past message | Keywords from the message |
| A file | The file name |
| A person | Their name or email address |
Filters: After searching, use the filters to narrow by type (Messages, Files, People), date, channel, or sender.
Search Tips
"exact phrase"— wrap in quotes for an exact matchfrom:name— find messages from a specific personin:channel— search within a specific channel
Finding files: You can also click the Files tab inside any channel to see all files shared there. For a full guide on SharePoint and shared files, see Working with SharePoint.
6. Managing Notifications
Teams sends notifications for @mentions, replies, and channel activity. Here is how to keep them manageable.
| Goal | How |
|---|---|
| Mute a noisy channel | Right-click the channel → Channel notifications → Off |
| Customise a channel | Right-click the channel → Channel notifications → Custom |
| Pin an important channel | Right-click the channel → Pin |
| Hide a channel you rarely use | Right-click the channel → Hide |
Using Copilot for Quick Questions
If you have a quick question about Teams — like how to find a channel, share a file, or mute a notification — try asking Copilot in the left sidebar. Type your question in plain language (e.g. "How do I mute a channel?") and it will answer immediately.
7. Live Captions and Translation in Teams Meetings
If English audio is difficult to follow, you can turn on live captions and set a translated caption language during a meeting.
Turn on translated captions (participant steps)
- Join the Teams meeting.
- In the meeting toolbar, click More (...).
- Open Language and speech (wording may vary by Teams version).
- Turn on Live captions.
- Set:
- Spoken language (the language being spoken in the meeting)
- Caption language / Translate to (the language you want to read)
- Keep captions visible at the bottom of the meeting window while listening.
Fast checks if translation options are missing
- Update Teams and rejoin the meeting.
- Try the desktop app if you are in a browser.
- Ask IT whether your organization license and policy allow translated captions.
8. Getting Help
| You Need Help With | Go To |
|---|---|
| Login or account issues | IT Support channel or the IT help desk |
| HR questions, policies, benefits | HR channel |
| Role-specific questions | Your manager |
| Getting added to a team or channel | Team admin or your manager |
| OVES documentation and guides | OVES Documentation Hub |
| Teams / docs / website summaries (digest tool) | OVES Scan Hub |
| Past training recordings | OVES SharePoint — Past Trainings |
| Work email (browser) | Outlook Web |
| All Microsoft 365 apps | Microsoft 365 Portal |
9. OVES Resources
Bookmark these links — you will use them regularly as an OVES employee.
OVES Scan Hub — Workspace Scanner
OVES uses a workspace scanner to build quick digests and summaries from Teams conversations, internal documentation, and public websites. You sign in with your Microsoft work account (same as Teams and Outlook — no separate password stored).
What you can scan:
| Scan type | What it does |
|---|---|
| Teams scan | Summarise messages in a team channel (e.g. training channel, project updates). Choose date range, summary style (weekly digest, training recap, action items, and more), and optionally save the summary to channel files. |
| Documentation scan | Paste a link to OVES documentation (e.g. a page on the Documentation Hub) and get a structured summary. Can crawl linked pages on the same site when needed. |
| Website scan | Paste a public website URL (e.g. omnivoltaic.com) and get a summary of the content. |
When it is useful: Catching up on a busy Teams channel, preparing for a training session, or turning long handbook pages into a short brief you can read quickly.
Go to: oves-scan-hub.omnivoltaic.com → Sign in with Microsoft → open Teams scan, Documentation scan, or Website scan in the left panel.
SharePoint and Forms scanning are also available on the same site for colleagues who need them.
Access recordings of previous training sessions held at OVES. Use this to catch up on sessions you missed, revisit topics from your onboarding, or explore training that was delivered before you joined.
Access your OVES work email from any browser without installing anything. Sign in with your work email and password.
Go to: outlook.office.com
Your hub for all Microsoft 365 apps — Word, Excel, PowerPoint, OneDrive, Teams, and more. Sign in with your work account to access everything from one place.
Go to: microsoft365.com
The central portal for all OVES documentation — including training materials, platform guides, SOPs, and department resources. Use this whenever you need a reference guide or want to explore documentation across the organisation.
Go to: docs.omnivoltaic.com
The public-facing Omnivoltaic website with company information, product lines (e-Mobility, Off-Grid Energy, Cross-Grid, Productive Use), and resources. Useful for understanding the business, our solutions, and what we do.
Go to: omnivoltaic.com
10. Add a shared mailbox in Outlook on the web
Use these steps when you need to work with a shared mailbox (a team or department inbox such as shared_email@omnivoltaic.com). You must already have been granted access by IT or the mailbox owner before the mailbox will appear when you search.
-
Open Outlook on the web in your browser and sign in with your work email and password.
- Go to: outlook.office.com (recommended for OVES/Microsoft 365), or sign in at outlook.com with your work account if directed by IT.
-
In the left sidebar, find Folders. Click the three dots (...) next to Folders, then choose Add shared folder or mailbox.
-
In the box that opens, type the email address of the shared mailbox (for example
shared_email@omnivoltaic.com). When the correct mailbox appears in the list, select it, then click Add.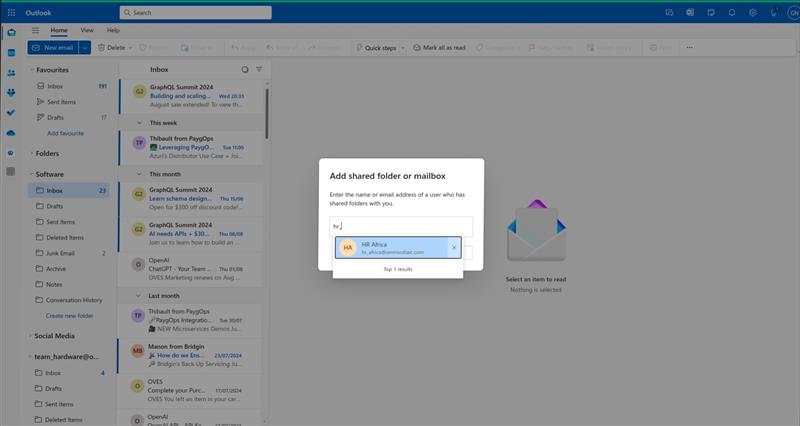
-
Under Folders, you will now see the shared mailbox listed. Click it to open Inbox (and other folders you have permission to use).
No result when you search?
Ask IT or your manager to confirm you have been added to the shared mailbox permissions. The mailbox cannot be opened from Outlook until access has been granted in Microsoft 365.
11. Common Questions
How do I add or open a shared mailbox in Outlook on the web?
Follow section 10 — Add a shared mailbox in Outlook on the web in this guide. You need IT or the mailbox owner to grant access before the mailbox appears when you search.
I don't see a channel I need
Ask the channel owner or your manager to add you. For onboarding channels specifically, you will be added automatically once your onboarding is complete.
I'm getting too many notifications
Right-click the channel → Channel notifications → Mute or Custom. You will still be notified if someone @mentions you directly.
How do I find old messages?
Use the search bar (Ctrl+E / Cmd+E) and filter by channel, sender, or date.
How do I set up a passkey instead of typing my password every time?
Follow Set Up Passkeys (Microsoft 365) in the Skills section: add a passkey at Security info, then use Sign-in options on the Microsoft login screen.
How do I turn on translated captions in a Teams meeting?
In a meeting, click More (...) → Language and speech → turn on Live captions. Then set Spoken language and Caption language / Translate to.
Can I use Teams on my phone?
Yes. Install the Microsoft Teams app from the App Store or Google Play and sign in with your work account.
What is the difference between a chat and a channel?
Chat is for one-on-one or small group conversations. Channels are for team-wide discussions and shared files — they are visible to all team members and keep a permanent record.
How do I share a file in a channel?
Click the paperclip icon in the compose box, or drag and drop a file. It will be saved to the channel's SharePoint library automatically.
Can I edit or delete a message I sent?
Yes. Hover over your message → click the three dots (...) → select Edit or Delete.
How do I schedule a meeting?
Click the Calendar icon in the left sidebar → New meeting → add a title, attendees, date, and time.
How do I organise my teams list?
Right-click a team to Pin or Hide it. Drag and drop teams to reorder them.
12. Your Onboarding Checklist
Work through this list during or right after your onboarding session. Tick each item as you complete it.
New Employee Checklist
- [ ] Sign in to Teams (desktop, web, or mobile)
- [ ] Locate OVES 全体 in the left sidebar (you will be added after onboarding)
- [ ] Open the Office 365 Onboarding and OVES Training channels once added
- [ ] Post a short introduction in your team channel — your name, role, and one fun fact
- [ ] Practice using an @mention in a message
- [ ] Use the search bar to find a message or file
- [ ] Pin at least one important channel
- [ ] Review your notification settings and adjust if needed
- [ ] Turn on Live captions in a Teams meeting at least once and set your preferred caption language
- [ ] Identify where to go for IT help and HR questions
- [ ] If you use a shared mailbox, add it following section 10 (above)