Content Editor Guide for Omnivoltaic Shopify Storefronts
Content Editor is an application in our Shopify and is essential for ensuring that your team can effectively use this tool for editing and managing site content.You can use Shopify's rich content editor to edit the content that appears on your online store. Here's a structured approach for the documentation:
Introduction
Welcome to the Content Editor, a powerful new feature in our Shopify platform. This tool allows for real-time editing and instant previewing of changes, streamlining the process of updating our storefronts.
Overview of the Content Editor
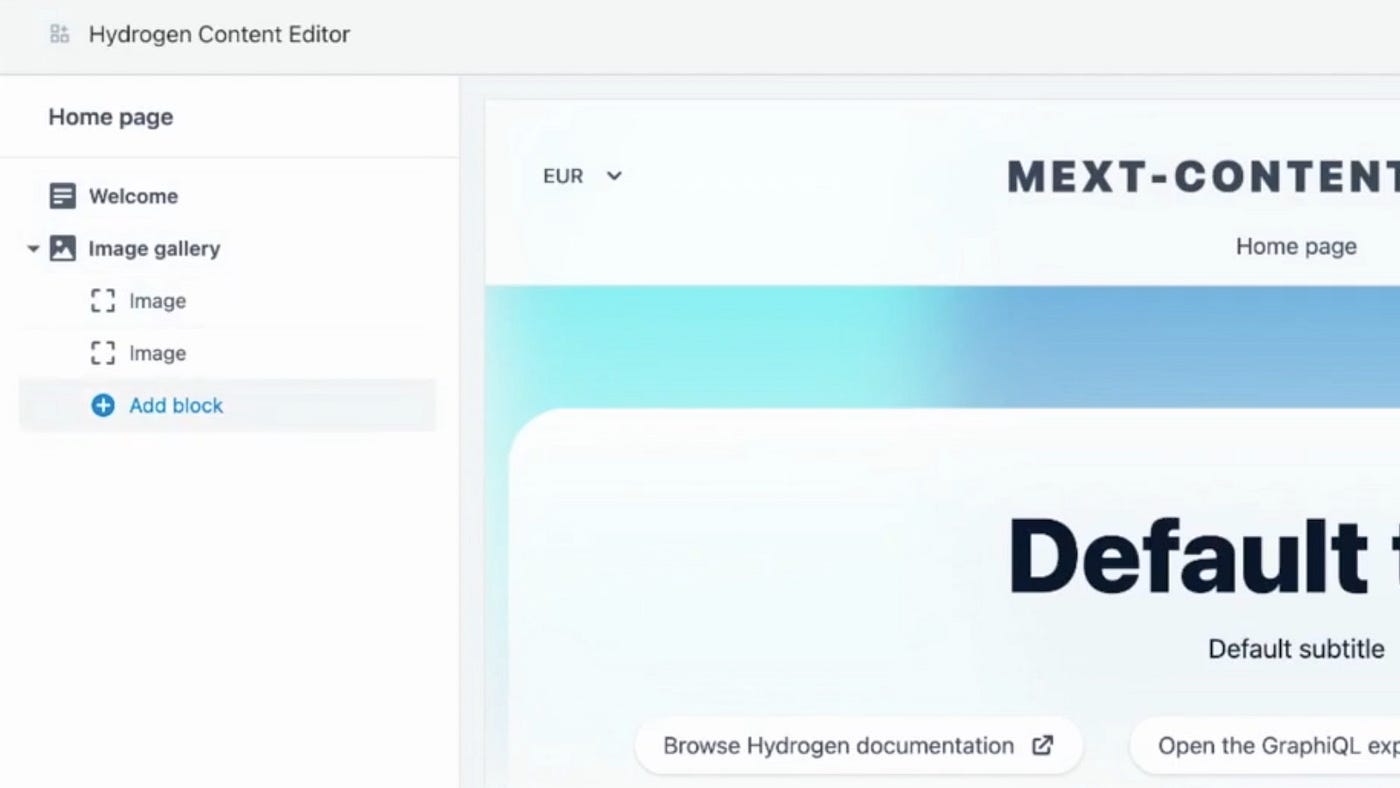
A content manager can access the Content Editor App directly from Shopify admin. The editing experience is very similar to the standard theme editor. There is a preview of the Hydrogen online shop on the right side and the editable components on the left side. The preview passes the component structure via postMassage from the iframe to the Content Editor App.
The Content Editor is divided into two main sections: the left side for editing and the right side for previewing.
GET STARTED
- In the app section on the left side bar, there is a content editor under the app section.
-
Inside the content editor there are four pages, that is the products, sites, metaobjects and items .

-
To edit products go to the products drop down under the content editor
- Items are to define properties
- sites is used to show all the sites that has the properties of a site eg , metadata,header, footer e.t.c
- meta objects consists of all site entries eg siteMap, article collection
Left Side: HTML Editing
- Purpose: This area is dedicated to making changes to the site using HTML.
- Capabilities: You can edit product descriptions, storefront pages, and other site elements.
- HTML Basics: A brief introduction to HTML for those unfamiliar with the language.
Right Side: Live Preview
- Functionality: Shows a real-time preview of the changes made on the left side.
- Non-Technical View: This side allows you to see how your edits will appear to the end-user, without needing to understand HTML.
(e.g)
LEFT - HTML editing RIGHT-Live Preview
<h3>Support</h3><p> <a href="/pages/page-amptorrent-faq" target="undefined">Frequently Asked Questions</a> </p>
Support
LEFT
<h3>Support</h3><p> <a href="/pages/page-amptorrent-faq" target="undefined">Frequently Asked Questions</a> </p>
RIGHT
Support
(e.g)
LEFT
<h3>Support</h3><p> <a href="/pages/page-amptorrent-faq" target="undefined">Frequently Asked Questions</a> </p>
RIGHT
Support
CONTENT EDITOR Summary

- ShopifyAdmin: Represents the Shopify admin area from where the Content Editor is accessed.
- ContentEditorApp: The main app interface, divided into HTML Editing and Live Preview sections.
- HTMLSection: Details functionalities like editing HTML, inserting links, formatting text, and inserting tables.
- LivePreview: Showcases real-time previews and comparison features.
- UserActions: User-related actions such as accessing the editor, editing content, and saving changes.
- Troubleshooting: Covers common issues and help-seeking options
Getting Started with Content Editor
Accessing the Content Editor
- Navigation: Steps to locate and open the Content Editor from the Shopify backend.
Editing Content
- Basic Edits: Instructions on making simple text changes.
- Advanced Edits: Guidance for more complex changes, like layout adjustments.
- Saving Changes: Ensure all changes are saved before leaving the editor.
Using HTML for Editing
You can enter HTML content for your blog posts, pages, product descriptions, and collection descriptions with the rich text editor. Click the </> Show HTML button to view the HTML code for the content inside the rich text editor. In the HTML view, you can make many changes to the content in the rich text editor.
You can add images, videos, or tables using HTML, and you can debug or fine-tune the layout and content style
HTML Editing Tips:
Formatting options
-
Paragraph
Most text content of your website is paragraph text. Paragraph text usually has a font size of 10–12 pt, but some themes use different font sizes.
-
Heading (1-6)
Headings are used to structure content. There are 6 heading levels. Heading 1 is the most important level and Heading 6 is the least important.
-
Blockquote
A block quote is used to show text that is attributed to someone else, like a quotation or an excerpt from a book or website.
Bold text
To make text bold, highlight the text and click the Bold button.
Italicize text
To make text italic, highlight the text and click the Italic button.
Underline text
To underline text, highlight the text and click the Underline button.
Create a bulleted list
To create a bulleted list, click the Bulleted list button.
You can type to create the first bulleted list item. To create new list items, press the enter or return key. To finish the list, press the enter or return key twice.
Create a numbered list
To create a numbered list, click the Numbered list button.
You can type to create the first numbered list items. To create new list items, press the enter or return key. To finish the list, press the enter or return key twice.
Indent text
Indenting a paragraph gives it a margin on its left side. To indent a paragraph, click the Indent button.
Unindent text
Unindenting a paragraph removes any indented margins that it has. To unindent or "outdent" a paragraph, click the Outdent button.
Align text
To align text, select the text, click the Alignment button, and choose Left align, Center align, or Right align.
Change text colors with the rich text editor
Steps:
- Highlight the text and click the Color button.
- Click a color or enter a hex code to change the highlighted text to that color.
Change text background colors
Steps:
- Highlight the text and click the Color button.
- Click the Background tab.
- Click a color or enter a hex code to change the highlighted text's background to that color.
Clear formatting in the rich text editor
To remove formatting from text or images, highlight the content and then click the Clear formatting button.
Insert tables with the rich text editor
You can insert tables in your blog posts, pages, product descriptions, and collection descriptions with the rich text editor. You can place text, images, or even videos into a table after you create it.
Steps:
- In the rich text editor, click the Insert table button.
- Click Insert table to insert a table. This creates a table with one row and one column.
After you've created a table, click the Insert table button again to modify the table's rows and columns:
- Insert row above: Place your cursor in a row and click this button to insert a new row above.
- Insert row below: Place your cursor in a row and click this button to insert a new row below.
- Insert column before: Place your cursor in a column and click this button to insert a new column before that column.
- Insert column after: Place your cursor in a column and click this button to insert a new column after that column.
- Delete row: Place your cursor in a row that you want to delete and then click this button.
- Delete column: Place your cursor in a column that you want to delete and then click this button.
- Delete table: Place your cursor anywhere in the table and then click this button to delete the entire table.
Insert links with the rich text editor
You can insert links (hyperlinks) in blog posts, pages, product descriptions, and collection descriptions with the rich text editor. You can add links that direct customers to pages within your Shopify online store and to other websites. You can also add links that open email messages or make phone calls, to help customers contact you.
Steps:
- Highlight the text or image that you want to turn into a link.
- Click Insert link.
- Enter the destination URL for the link in the Link to field:
- To link to an external website that is outside of your Shopify store, enter
https://followed by the web address, for examplehttps://www.example.com. - To link to a page within your Shopify online store, enter the short URL, for example
/collections/summer-collection. - To create a link that opens an email message, enter
mailto:followed by the email address, for examplemailto:example@example.com. - To create a link that makes a phone call, enter
tel:, followed by the phone number, for exampletel:+0-123-456-7890.
- To link to an external website that is outside of your Shopify store, enter
- Enter a short description of the link in the Link title box.
- Choose how the link will open with the Open this link in menu:
- the same window: The link will open in a user's existing browser tab or window.
- a new window: The link will open in a new browser tab or window.
- Click Insert link to convert your highlighted text into a link.
Add internal and external links with the rich text editor
Links to pages within your Shopify store are called internal links. You can use short URLs to create internal links. For example, the URL /collections will point to your store's collections page.
To link to a specific page of your online store, such as a collection or product page, use the URL format /page-type/page-handle. For example, to link to a collection you've created called Summer Collection, use the URL /collections/summer-collection.
Note You can check the handle of a product, collection, page, or blog by visiting its main page in your Shopify admin, finding the Search engine listing section, and clicking Edit.
Links to websites that are outside of your Shopify store are called external links. External links need to be entered in full and begin with http://.
Previewing Changes
- Real-Time Preview: changes reflect immediately in the preview.
- Comparing Changes: You can compare the original content with the preview , and what will appear in the preview will show on the sites directly , content editor helps in comparing the original and edited versions.
Best Practices
- Regular Backups: Advice on regularly backing up your site before making major changes.
- Consistent Styling: Recommendations for maintaining a consistent look and feel across your site.
- Collaboration: Guidelines for working with team members on the Content Editor.
Troubleshooting
- Common Issues: Solutions to typical problems users might encounter.
- Seeking Help: Where to get additional support if needed.
Additional Information
HTML resuorces: Links to HTML tutorials or refenec materials.
Shopify Support : Information on accessing Shopify’s customer support for additional help.
Conclusion
The content Editor is a versatile tool designed to make website management more efficient and user-friendly. The guide is intended to be a starting point for Using the Content Editor.